Set up Depreciation - Inventory Value Reduction
This guide provides the steps to set up inventory reduction.
Please note
The purchase price on the product page always remains the price at which the product was booked. The purchase value after depreciation is visible in the Excel export via assortment (see the steps below under View Depreciations in Separate Columns in Excel).
Activate Inventory Reduction Function
- 1
In the menu, click on Shop Settings (under Settings)
- 2
Click on the Advanced tab
- 3
Activate the switch: Enable Inventory Write-down.
- 4
Click the Submit button.
Set up Depreciation Rules
- 1
In the menu, click on Item Groups
- 2
Click the button with the 3 dots in the top right corner
- 3
Select the Inventory Depreciation Setting option
- 4
Click the Add New Setting button
- 5
Enter the desired data for this depreciation rule:
Name: Name for internal use
Depreciation up to a maximum of this percentage of the purchase value: Enter the percentage up to which you want to depreciate the total inventory
- 6
Click the New Year of Depreciation button to add the total number of years over which you want to depreciate.
- 7
Enter the percentage by which you want to depreciate the inventory for each year. For example, 10 or 20 (if you want to depreciate by 10% or 20%).
- 8
Click the Save button.
Important
Please note: this percentage applies to the purchase price of the previous period and not the initial purchase value. So, if the purchase value was depreciated from 10 to 8 last year, this year the percentage will be calculated on the 8.
Depreciation Rule per Item Group
- 1
In the menu, click on Item Groups (under Inventory)
- 2
Click the pen icon for the relevant item group.
- 3
Select the desired depreciation rule in the 'Depreciation of items in this item group' field
- 4
Click the Update button.
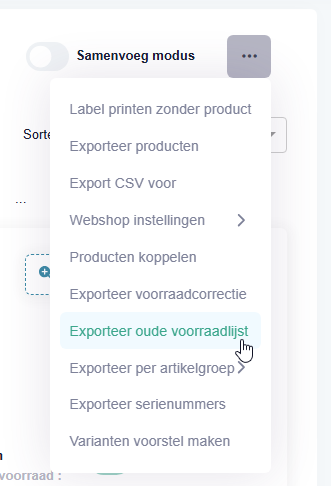
View Depreciations in Separate Columns in Excel
- 1
In the menu, click on Assortment (under Inventory)
- 2
Click the button with the 3 dots in the top right corner.
- 3
Click the Export Old Stock List option
- 4
A new screen will appear. Find the desired date for which you want to create an export.
- 5
If desired, change the depreciation period to Annually or Quarterly.
- 6
Click the download button next to the desired export.
Manually Depreciate a Product
- 1
In the menu, click on Assortment (under Inventory).
- 2
Click the View button next to the relevant product.
- 3
Click the eye icon above the Purchase and Sales History button (on the right-hand side)
- 4
Enter the desired purchase price you will use after depreciation.
- 5
Click the V icon next to the input field.
The depreciation per product is carried out immediately. If you reload the page, the date on which you last depreciated will be visible. Export the stock list (see above) to view the depreciation.
Was this article helpful?
Another question?
Ask Linde — answers come with sources.